 |
 |
 |
 |
|
|
Zelda I Quest 2 Walkthrough
Second
Quest Overworld Map
|
|
|
|
|
|
Starting location, and the point of reference I use in the walk-throughs |
|
|
Level 1 |
|
|
Level 2 |
|
|
Level 3 |
|
|
Level 4 (need power bracelet) |
|
|
Level 5 (need raft) |
|
|
Level 6 (blow whistle) |
|
|
Level 7 (burn bush) |
|
|
Level 8 (bomb fifth wall from the left) |
|
|
Level 9 (bomb wall) |
|
|
White Sword (need to have at least 5 heart containers) |
|
|
Magical Sword (need to have at least 12 heart containers) |
|
|
Heart Container or Red Potion (move gravestone) |
|
|
Heart Container (use stepladder) |
|
|
Heart Container or Red Potion (blow whistle) |
|
|
Heart Container or Red Potion (blow whistle) |
|
|
Heart Container or Red Potion (use raft) |
|
|
Blue Ring (go thru invisible wall in R,2) |
|
|
Power Bracelet (under an Armos knight) |
|
|
Letter (use power bracelet to push rock) |
|
|
Warp Point (move rock to reveal stairway) |
|
|
Warp Point (move rock to reveal stariway) |
|
|
Warp Point (move rock to reveal stariway) |
|
|
Warp Point (move rock to reveal stariway) |
White Sword (L,1):
From the starting screen, go right one screen, up five screens, left one
screen, up one screen, right three screens, and up one screen. You must
have at least five hearts in order to get the White Sword.
Magical Sword (K,1):
From the starting screen, go right one screen, up five screens, left one
screen, up one screen, left across the river, up one screen and right two
screens. Use the Power Bracelet to push against the rocks to reveal a hidden
stairway.
Blue Ring (E,4): From the starting screen, go right four screens, up five screens,
right two screens, up one screen, right two screens, and up one screen by
walking through the wall behind the tree.
Letter (B,2): First, got to the middle right screen in the Graveyard. Then go
right two screens, up one screen and take the right stairs, right one screen, up
one screen, left two screens, up one screen, left one screen, and down one
screen. Using the Power Bracelet, push against one of the rocks to reveal a
stairway.
Power Bracelet (E,3): From the starting screen, go right one screen, up five screens,
left two screens, down one screen, left one screen, up one screen, and left one
screen. The power bracelet is hidden under one of the Armos knights.
1st Heart Container (A,3): From the starting point, go
right four screens. Bomb the second wall from the right of the path at
the top of the screen.
2nd Heart Container (R,6): From the starting screen, go
right eight screens, and up two screens. Cross the little platforms in
the water to get the heart (you need the stepladder).
3rd Heart Container (G,1): From the starting screen, go
right one screen, up five screens, left one screen, up one screen, across
the river, up one screen, and left one screen. Blow the whistle to reveal
a stairway.
4th Heart Container (L,4): Fromt the starting screen, go
right one screen, up five screens, right two screens, and down one screen.
Blow the whistle to reveal a hidden stairway.
5th Heart Container (R,3): From the starting screen, go
right eight screens, and up five screens (you'll use the raft).
Level one is the only level in the second quest
that is in the same location as in the first quest. It is in grid location
(H,4). From the starting screen, go right one screen, up four screens, and left
one screen. This level is fairly easy to beat, and you shouldn't have many
problems with it. The item you get in this level is the wooden
booomerang.
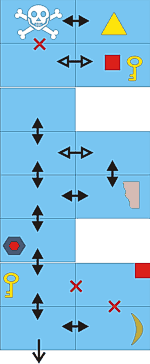
The first tip I need to give yuo is about the enemies in the game. Looks can be deceiving. Remember those ridiculously easy white skeletons from the first quest? Well, these guys are a little different now. They shoot swords at you, and you can only block them with the big shield. If you're in the green outfit, they take away two hearts, so be careful when you're around them.
Here's how to get the boomerang: From the entrance, simply go right one room and kill all the enemies. The boomerang will then appear in the middle of the room.
To get to the boss, you'll need to go through a secret passageway. From the first room, go right one room, and bomb the upper wall and go up one room. Go through the secret passage, then go left one room, bomb the wall and go up one room. The boss of this level is the familiar Aquamentis.
Level 2 is located where the Blue Ring was in the first quest, in grid location (E,4). From the starting screen, go up one screen, left three screens, and up one screen. The entrance is hidden under an Armos knight. As a word of caution, the levels get more difficult from here on in. You will encounter more difficult enemies like Gibdos and Darknuts. Also, the levels in the second quest have a new twist: invisible doorways. These are when you can just walk right through a wall. You walk against it momentarily and you'll pass through it. These invisible doors are indicated by purple arrows, note that some are one way only. The item you get in this level is the whistle.
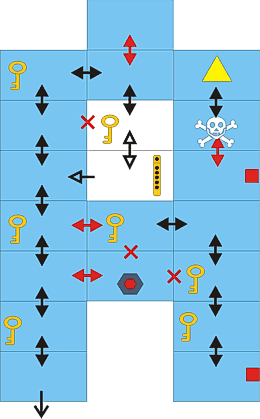
The item you get in this level is the whistle. From the first room, go up five rooms, bomb the wall and go right one room, and go down one room through an invisible door (walk right through the wall). Find the secret staircase to go get the whistle.
To get to the boss, from the first room, go up two rooms, right two rooms (bombing a wall in the process), and down two rooms. Go through the secret passageway and go up one room. The boss of this level is a two-headed Gleelock. You should remember how to take this guy out from the first quest.
Level 3 is located where level 2 was in the first quest, in grid location (N,4). From the starting screen, go right four screens, up two screens, take the upper path and go right two screens, up one screen, left one screen, and up one screen. You'll see an empty pond here, simply blow the whistle and the pond will dry up, revealing the entrance. As a little tip, if you haven't gotten the White Sword yet, I recommend that you do so now. It'll only make things easier. Also, use the whistle to get the heart container in (L,4). The item in this level is the Magical Boomerang. But if you want the boomerang, you must have the bait to give it to one of the "Grumble Grumble..." guys.
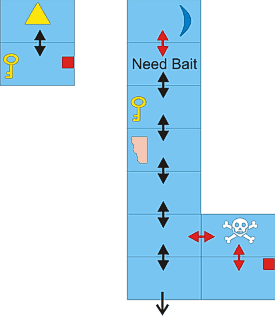
The Magical boomerang is located at the top of the "L". From the first room, simply go up six rooms. Before the last room, you have to give the bait to the red Goriya that says "Grumble Grumble."
This level is unique in that the boss is not located in a room right below the Triforce. To beat the boss, go up one room and right one room. Kill the Dodongos to get a heart container. To get the Triforce, then go down one room, through a secret passage, and up one room. This level was a break, the next ones get a lot harder.
Level 4 is located right below where level 5 was in the first quest, in grid location (M,2). But first of all, you must have the Power Bracelet to get into this level, if you don't have it, then get it now. The Power Bracelet is in grid location (E,3). Now that you've got that, here's how to get to the level: from the starting screen, go right one screen, up five screens, left one screen, up one screen, and right four screens. Push against a rock to open up a hidden stairway. One more warning, have at least one hundred rupees (or 200 if you want to carry more bombs). You will encounter a guy who says "Leave your life or money." Definitely leave your money, otherwise you'll lose a whole heart container. The items in this level are the Raft, and the Magic Book.
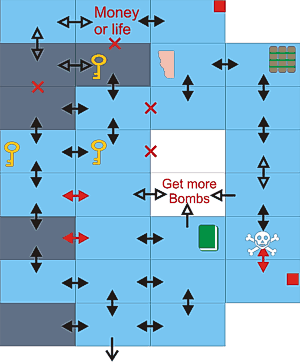
To get the Magic Book (the most useless item in the game, in my opinion), from the first room, go up one room, left one room, up one room, and left two rooms. If you want more bombs, simply go up one room after you get the book.
This level is different in that you have to beat the boss before you can get the main item. To get to the boss, from the first room, go up one room, left one room, up six rooms (bombing the second-to-last one, and walking through an invisible wall in the last one). Now, before you go to the next room MAKE SURE YOU HAVE 100 RUPEES! If you don't, then you'll lose a heart container permanently. Now, go right two rooms, go through a secret passageway, and go up one room to fight the boss, Digdogger. Once you kill him, go up one room. WAIT! If you want the raft, don't get the Triforce yet. From the Triforce room, go up three rooms (you'll pass through an invisible door in the Triforce room). Once you get the raft, go back down and fetch the Triforce.
Level 5 is located where level 4 was in the first questm in grid location (F,5). From the starting screen, go left one screen, up one screen, left one screen, and up two screens using the raft. The item you get in this level is the Bow.
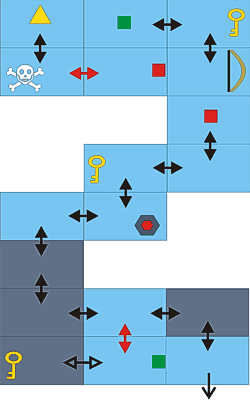
Getting the bow isn't very difficult. From the first room, go up one room, left one room, down one room, through a secret passageway, go right one room, and down one room.
To get to the boss, from the first room, go up one room, left two rooms, up two rooms, right one room, up one room, right one room, up one room, through a secret passageway, and left one room. The boss of this level is a three-headed Gleelock. Just kill him and get it over with, that guy's been struttin' around like he owns the place.
Level 6 is located in the left middle screen of the graveyard, in grid location (A,4). The easiest way to get there is to take one of those warp stairways. From the starting screen, go left two screens. Push one of the rocks to reveal a staircase and go down it. Now take the stairway in the middle. From there go down one screen, and left three screens. But WAIT! Since you're in the graveyard, you might as well get the heart container that's there (if you haven't already). Just go up from level 6 and push on a tombstone to reveal a stairway. Now that you've gotten the heart, go back down a screen and blow your whistle. The item in this level is the stepladder.
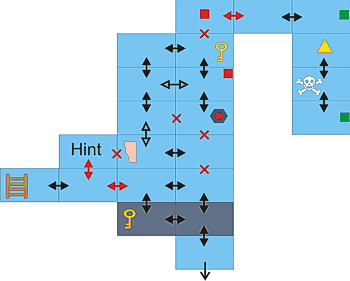
To get the stepladder, from the first room, go up two rooms, and left three rooms. Gotta love that stepladder.
Now it's time to go fight that crazy Gohma. She sure is a character. From the first roo, go up five rooms and through a secret passageway. Then go right two rooms and through another secret passageway. Go up one room to fight a blue version of our good old friend Gohma.
Level 7 is located in grid (N,7). From the starting screen, go right four screens, up two screens, take the upper path right one screen, and down one screen. See the row of bushes that has only two bushes in it? Burn the bush closest to you to reveal level seven. But wait! Have you gotten the rest of those heart containers? Why don't you go and get them, and then get the Magical Sword. This level is full of annoying secret passageways, some of which only go one way. As a word of caution, make sure you have at least two hundred rupees, because there are two "Leave your life or your money" guys. The item in this level is the Red Candle.
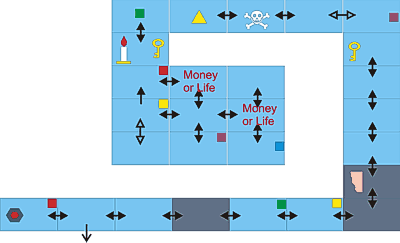
So you want the Red Candle, huh? I guess I'll tell you where it is because you asked me so nicely. From the first room, go right three rooms and then go through a secret passageway. Then go down one room. Kill all the bad guys, yadda, yadda, yadda, and make the staircase appear.
Time for the boss. From the first room, go right five rooms, up five rooms, and through a secret passageway. Then go up one room, right one room (pay the dude a hundred ruppees), and go down one room and through another passageway. Then go left two rooms to fight yet another Gleelock.
Level 8 is located in grid (K,2). From the starting screen, go right one screen, up five screens, left one screen, up one screen, and right two screens. Use the stepladder to walk over the river and up to the wall. Bomb the fifth wall from the left (I think it's the fifth, but it might be the fourth, but I know it's somewhere around there). The items in this level are the Magic wand and the Magical Key. Also, have some rupees handy if you want to increase your bomb capacity.
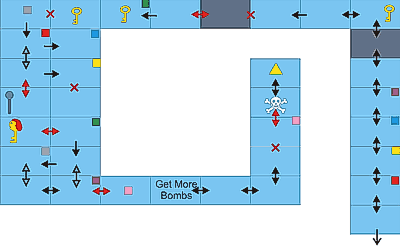
Now it's time to get the dinky little wand. It doesn't really serve any useful function (in my opinion), but it's fun to have. From the first room, go up one room and through a secret passageway. Then go down to rooms (through an invisible door and through a bomb-door). Then kill all the guys and open the secret staircase to get the wand.
The Magical Key is probably one of the most useful items, it makes life a lot easier. From the first room, go up seven rooms, left five rooms and through a secret passageway. Bomb the wall and go left one room to get the key.
For the bomb increase, make sure you have enough money first. From the first room, go up seven rooms, left five rooms and through a secret passageway. Then go down two rooms, right one room and through another passageway. Then go down two rooms and left two rooms.
To get to the boss, some puny Dodongos, from the first room, go up seven rooms, left five rooms and through a secret passageway. Then go down two rooms, right one room and through another passageway. Then go up one room.
Level 9 is located in grid (A,1). It's the absolute upper left-hand corner of the overworld. Thw quickest way to get there is through one of our trusty secret warp stairways (remember those?). From the the starting screen, go left two screens and push the rocks to reveal the stairway, taking the middle steps. Then go down one screen and take the right-hand ladder and go back up. Then go right one screen, up one screen, left one screen, up one screen, and left three screens. One of the walls is bombable, I forget which one exactly. Now it's time for you to defeat the evil Ganon and save the princess. The items in this level are the Red Ring and the Silver Arrows.
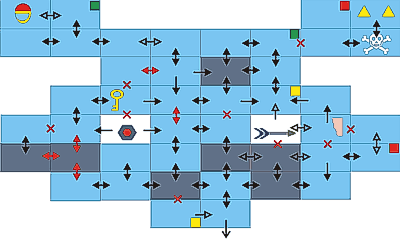
The next item you want to get is the trusty red ring. From the first room, go up one room, left three rooms, up three rooms, right one room, up one room, right one room, up one room, left two rooms, up one room, and left one room. Did you get that? Maybe I should repeat it.just kidding. Hah! I had you, admit it!
Now for the legendary Silver Arrows, the weapon you must use in order to smite thine enemies! From the first room, go up two rooms, right two rooms (both passageways are invisible doors, just walk through the walls), up 1 room (use a bomb to open a passage), and left 1 room (through another invisible wall). Kill all the Wizzrobes and push the block to reveal a hidden staircase. Pretty simple, huh?
So you want to beat Ganon, huh? What makes you think you're any match for him? Oh yeah, I forgot. Those arrows, yeah, that'll do it. Well, if you want him that bad, I'll tell you how to get there. From the first room, go up one room, left three rooms, up three rooms, right one room, up one room, right one room, up one room, left two rooms, up one room, and through a secret passageway. Then go right two rooms to fight Ganon. I'm assuming you already know how to beat him from the first quest if you don't.well, tsk tsk tsk.